普段, Jetson Nanoでカメラを使う際にはUSBタイプを使うのだが, 今回MIPI CSI-2タイプのカメラを試している.
[Jetson Nano]
[カメラ]
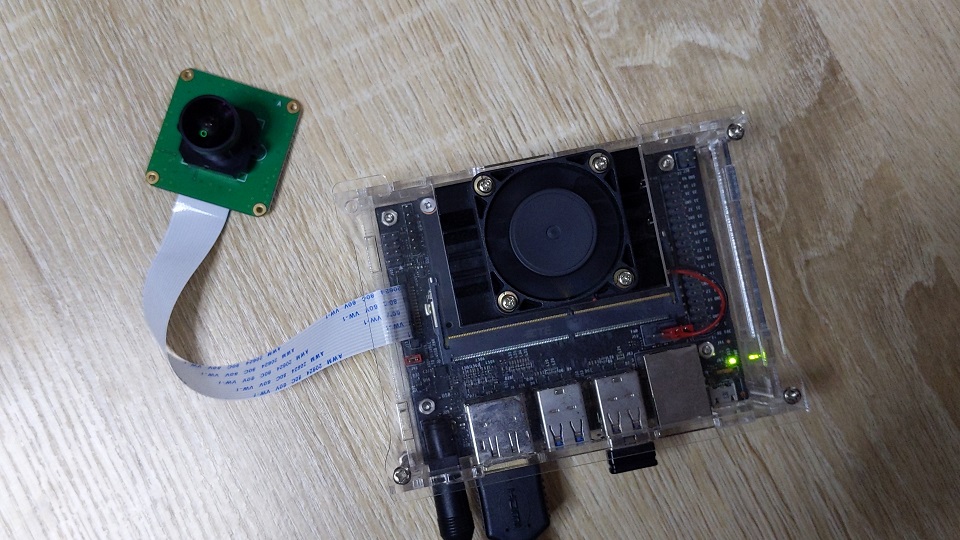
前回記事では, MIPI CSI-2カメラを接続し, 映像が出るところまで確認した.
しかし, 表示した映像の周囲が少し赤みがかるなど, 画質(色味)がよくない.

関連記事:
- Jetson NanoにCSI-2カメラを繋いでみたー(1)
- Jetson NanoにCSI-2カメラを繋いでみたー(2)
1. 色味補正[1][2]
ネット情報を調査したところ, カメラパラメータを調整することで, 同様の症状が解消した例があった.
今回使用しているカメラのセンサSony IMX219はブログ記事と同様のものだったので, 記事に書かれている対策案を試してみた.
(1) カメラのチューニングプロファイルをダウンロードする.
$ wget https://www.waveshare.com/w/upload/e/eb/Camera_overrides.tar.gz
$ tar zxvf Camera_overrides.tar.gz
camera_overrides.ispというファイルが保存される.
ファイルの中身の詳細はわからないが, NVIDIAが作成したカメラパラメータを記したファイルのようである.
# Char-lite Calibration
# command:     nv_wrapper 1 optical_black_file ..\examples\outputs\ob.cfg lsc ..\examples\outputs\lsc.cfg awb ..\examples\outputs\awb.cfg ccm ..\examples\outputs\ccm.cfg target auto public_params public_params_auto.cfg out_name ..\examples\outputs\camera_overrides.isp
# version:     1.9.0
# created on: 17-Apr-2019 00:56

#* =============================================================
#* ISP Configuration Override File
#* Copyright (c) 2012-2018, NVIDIA CORPORATION.  All rights reserved.
#* Model:model
#* Integrator:
#* Part#:
#* Sensor:sensor
#* Size:
#* Version: version
#* FileName & Location: ~/camera_overrides.isp
#* Updated:Thu Oct 21 17:35:20 2018 PST
#* =============================================================
sensor.companding.enable = TRUE;
sensor.companding.LUT = {2048, 2048,  65536, 3040,  1048576, 4000,  1048576, 4096};
scene.brightnessKey = {0.01, 0.02, 0.05, 0.1, 0.2, 0.5, 1};
scene.toneTable.axisX = {10, 100, 1000, 10000};
scene.toneTable.axisY = {30, 60, 90, 120};
saturation.strength     = {0.0, 0, 0, 0, 0, 0, 0};
noiseReduction.strength = {0.5, 0.5, 0.5, 0.5, 0.5, 0.5, 0.5};
sharpness.strength      = {0.5, 0.5, 0.5, 0.5, 0.5, 0.5, 0.5};
gtm.enable = TRUE;
gtm.preset[0] = {0, 0,  0.25, 0.25,  0.5, 0.5,  0.75, 0.75,  1, 1};
dae.mode = 1;
dae.enableGammaPQ = TRUE;
dae.EVCompensation = 0.0;
dae.highlightControl = 0.5;
dae.shadowControl = 0.5;
ltm.enable = TRUE;
ltm.enableLf = TRUE;
ltm.strength = { 0.5, 0.5, 0.5, 0.5,
                 0.5, 0.5, 0.5, 0.5,
                 0.5, 0.5, 0.5, 0.5,
                 0.5, 0.5, 0.5, 0.5 };
awb.nightmode.enable = TRUE;
awb.nightmode.gains = {2.5, 1, 1, 3.2};
em.initialState = 0;
em.thresholdLow = 2080;
em.thresholdHigh = 3232;
# Sensor specific values
# em.preset[0].exposureControl.exposureTime = {sensor_long_exposure, sensor_short_exposure, sensor_veryshot_exposure};
# em.preset[0].exposureControl.sensorGain = {gain_long, gain_short, gain_veryshort};
em.preset[0].wbgains = {1.5, 1.0, 1.0, 1.5};
# Sensor specific values
# em.preset[1].exposureControl.exposureTime = {sensor_long_exposure, sensor_short_exposure, sensor_veryshot_exposure};
# em.preset[1].exposureControl.sensorGain = {gain_long, gain_short, gain_veryshort};
em.preset[1].wbgains = {1.5, 1.0, 1.0, 1.5};
#-----------------------------------------------------
# AWB Parameters
#-----------------------------------------------------

# AWB
awb.GrayLineThickness     	 = 0.0240;
awb.HighU                 	 = 1.2799;
awb.LowU                  	 = 0.6898;

#Lens shading falloff factor
lensShading.falloff_factor = 20;
#-**************************************************************************
#-* Below parameters are calculated from calibration process.  Do not edit!
#-**************************************************************************

# AWB
awb.GrayLineSlope         	 = -1.1026;
awb.GrayLineIntercept     	 = 2.3491;
awb.UtoMIRED              	 = {-473.730731133966, 756.426811055157};
awb.MIREDtoU              	 = {-0.002110903799, 1.596744229036};
awb.UtoCCT                	 = {7546.483390813147,-3207.015847457883};
awb.CCTtoU                	 = {0.000132512052,0.424968250955};
# CCM
colorCorrection.srgbMatrix[0]	 = {2.20213000,-0.25650000, 0.07458000};
colorCorrection.srgbMatrix[1]	 = {-1.27425000, 1.45961000,-1.35791000};
colorCorrection.srgbMatrix[2]	 = {0.07212000,-0.20311000, 2.28333000};
# Optical Black
opticalBlack.manualBiasR  	 = 64;
opticalBlack.manualBiasGR 	 = 64;
opticalBlack.manualBiasGB 	 = 64;
opticalBlack.manualBiasB  	 = 64;
opticalBlack.float.manualBiasR	 = 0.06256109;
opticalBlack.float.manualBiasGR	 = 0.06256109;
opticalBlack.float.manualBiasGB	 = 0.06256109;
opticalBlack.float.manualBiasB	 = 0.06256109;
#-----------------------------------------------------
# Lens Shading Parameters
ap15Function.lensShading = TRUE;

#-----------------------------------------------------

# Lens Shading Surfaces
falloff_srfc.controlPoint[0][0]	 = 0.000000000000;
falloff_srfc.controlPoint[0][1]	 = 0.150902189443;
falloff_srfc.controlPoint[0][2]	 = 0.324293856828;
falloff_srfc.controlPoint[0][3]	 = 0.438445033351;
falloff_srfc.controlPoint[0][4]	 = 0.668381030545;
falloff_srfc.controlPoint[0][5]	 = 0.668639363772;
falloff_srfc.controlPoint[0][6]	 = 0.438316084603;
falloff_srfc.controlPoint[0][7]	 = 0.323263689360;
falloff_srfc.controlPoint[0][8]	 = 0.150555377651;
  (省略)
(2) チューニングプロファイルを所定のディレクトリにコピーする.
$ sudo cp camera_overrides.isp /var/nvidia/nvcam/settings/
$ sudo chmod 664 /var/nvidia/nvcam/settings/camera_overrides.isp
$ sudo chown root:root /var/nvidia/nvcam/settings/camera_overrides.isp
(3) カメラアプリを起動して, 映像を確認する.

表示された画像を見る限り, 画像の周囲の赤みがかったところがかなり改善されていることを確認した.
一応色味もかなりよくなったので, これを使って何か作ってみようと思う!!
----
[1] Fix pink tint on Jetson Nano wide angle camera | by Jonathan Tse
[2] JetsonNanoのカメラの色味を補正する。- masato-ka's diary
")
")

![ディジタル画像処理 [改訂第二版]](https://m.media-amazon.com/images/I/41KXTZ-UfaL._SL500_.jpg "ディジタル画像処理 [改訂第二版]")